LAB 1A: Setup and Examples
1A PRELAB
For the prelab, the Arduino IDE and the Appollo3 boards manager were installed.
Blink
An LED on the Artemis board was blinked.
Serial
The board is able to read the serial input echo the same output to the serial monitor.
AnalogRead
The board continuously outputs the analog value detected by its temp sensor through the serial monitor. And we can see the temperature went up as the board was held.
MicrophoneOutput
In this part, the microphone on the board recorded the voice it recieved, and returned the frequency of the loudest sound source using Fourier Transform. The frequency can be seen changing as I speak.
LAB 1B: BLE Communication
1B PRELAB
The prelab focused on setting up Bluetooth Low Energy (BLE) communication between a computer and the RedBoard Artemis Nano using Python (Jupyter Notebooks) and Arduino.
1. Computer Setup
Installed Python 3.10+, `pip`, and set up a virtual environment (venv) named
FastRobots_ble. Required Python packages were installed within the
virtual environemnt with
pip install <package>, including numpy, pyyaml, and
bleak.
2. Jupyter Server & Codebase
The Jupyter server was started, and the demo.ipynb notebook was reviewed for BLE command interactions. The `connections.yaml` file was updated with the Artemis MAC address (printed in part 3).
3. Artemis Board Setup
The ArduinoBLE library was installed in the Arduino IDE, and the ble_arduino.ino sketch was uploaded to the Artemis board. The baud rate was set to 115200 bps, and the Artemis board successfully printed its MAC address.
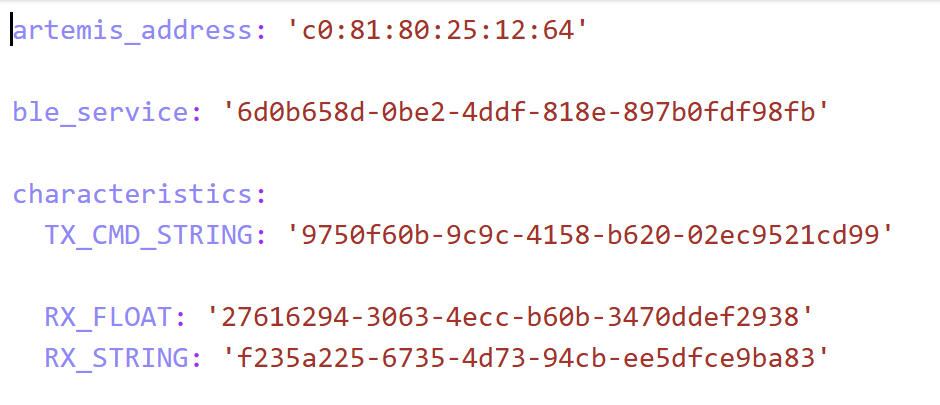
4. BLE Configuration
A unique UUID was generated with:
from uuid import uuid4
The BLE service UUIDs were updated in both the Arduino sketch and the
Python configuration file (connections.yaml) with this newly generated
UUID to prevent interference with other devices.
uuid4()
5. Testing BLE Communication
BLE communication was tested using demo.ipynb, following the provided demo. All configurations were validated before starting the lab tasks.
The codebase enables BLE communication between the computer and the Artemis board. The Artemis acts as a BLE peripheral, advertising its presence and exposing characteristics for data exchange. The computer, acting as the BLE central, connects to the Artemis and sends commands via BLE characteristics.
1. Artemis Board (Peripheral) Advertises BLE Service
The Arduino code (`ble_arduino.ino`) initializes a BLE service and starts advertising its availability. It defines characteristics for sending and receiving data using Universally Unique Identifiers (UUIDs).
                BLE.setDeviceName("Artemis BLE");
                BLE.setLocalName("Artemis BLE");
                BLE.setAdvertisedService(testService);
2. Computer (Central) Connects to Artemis
The Python script (`demo.ipynb`) discovers and connects to the Artemis board using a BLE controller.
                ble = get_ble_controller()
                ble.connect()
3. Sending Commands from Computer to Artemis
The computer writes commands to the RX characteristic, and the Artemis reads the command using:
                if (rx_characteristic_string.written()) {
                    handle_command();
                }
For example, when the computer sends a PING command:
ble.send_command(CMD.PING)
The Artemis processes it and responds with "PONG".
                tx_estring_value.clear();
                tx_estring_value.append("PONG");
                tx_characteristic_string.writeValue(tx_estring_value.c_str());
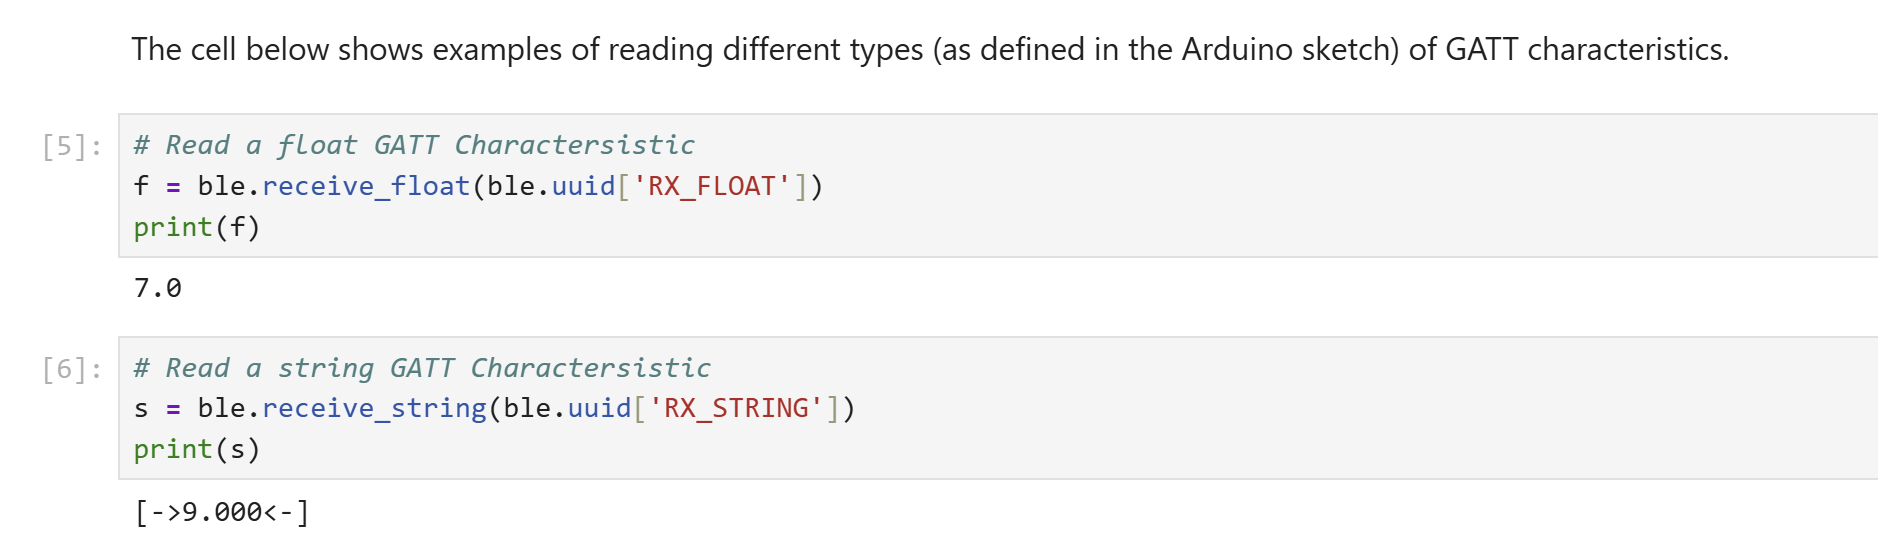
4. Receiving Data on Computer
The computer reads sensor data or responses from the Artemis via BLE characteristics.
                s = ble.receive_string(ble.uuid['RX_STRING'])
                print(s)
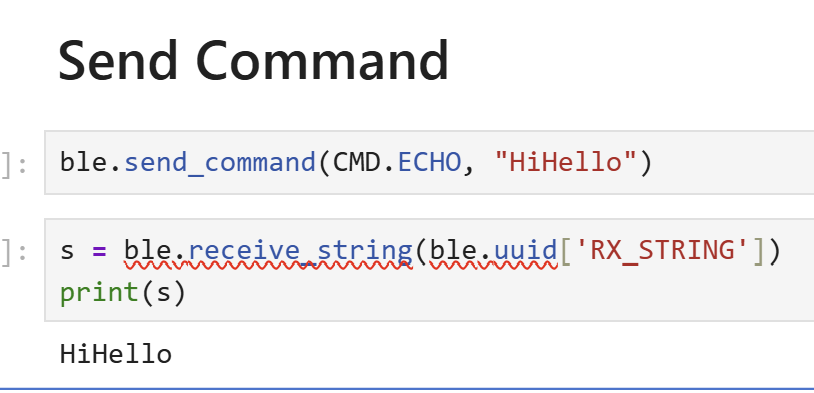
ECHO
A string value sent from the computer to the Artemis board with the ECHO command. The
Artemis board receives this command and handle_command() updates the tx string
GATT characteristic. The code snippet below shows the ECHO case statement within
handle_command()
Below are images of transmitting and receiving from Jupyter Notebook and the serial monitor of the Artemis board.

SEND_THREE_FLOATS
Three floats are sent from the computer to the Artemis board with the SEND_THREE_FLOATS
command. The Artemis board receives this command and handle_command() extracts the
values with get_next_value(..) and stores the floats into memory. The code snippet
below shows the SEND_THREE_FLOATS case statement within
handle_command()
Below are images of transmitting from the Jupyter Notebook and the serial monitor of the Artemis board.


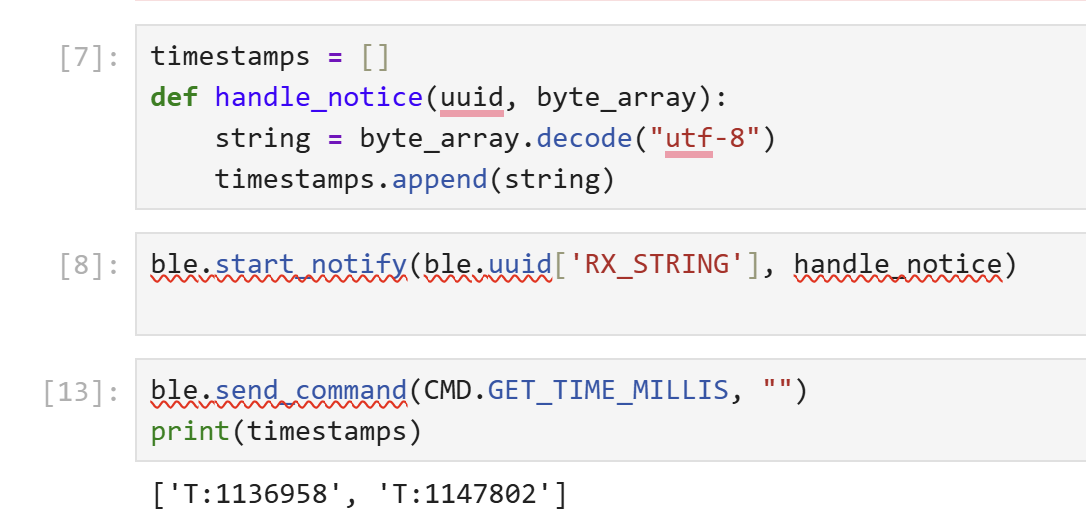
GET_TIME_MILLIS
The GET_TIME_MILLIS command is sent from the computer to the Artemis board. The Artemis
board receives this command and handle_command() updates the TX string GATT
characteristic
to be the current time in milliseconds. The current time in milliseconds can be checked with
millis(). The next time the computer reads the TX string characteristic, it sees
the updated time.
Below are images of transmitting and receiving from the Jupyter Notebook

NOTIFICATION HANDLER
The handle_notice(uuid, byte_array) command is the callback function that is
executed each time the string characteristic (TX for Artemis, RX for Jupyter) is updated. Within
this function,
the byte_array is decoded and the timestamp is saved to a timestamps array.
The callback function is linked to each udpate of the string characteristic with the
start_notify(..) command.
REAL-TIME DATA RATE
We tested the data transmit rate by writing a loop that polled the current time in milliseconds, and send it via BLE to the computer. The code below shows the handler for the TEST_DATA_RATE command.
Below are images of the received timestamps in Jupyter Notebook.

For a loop that lasts 3 seconds, 88 entries were received. Each entry is 10 bytes. 3 bytes
encode the "T:" prefix, and 6 bytes encodes the 6-digit integer as a string. The last byte is
the null terminator character.
Multiplying the 88 entries by 10 bytes each, a total of 880 bytes were transmitted in 3 seconds,
so the data rate is 293 bytes/second.
PRE-STORED DATA RATE
In the previous loop, we tested the data transmit rate by writing a loop that polled the current
time in milliseconds,
and
send it via BLE to the computer within a single iteration. However, the data rate can be
increased by only storing the timestamp into an array during each iteration, and having a
seperate command to iterate through and send each entry in the array. The code below shows the
handler for the POPULATE_TIME_DATA command which populates a time_buffer
with timestampd data.
command.
Along with POPULATE_TIME_DATA, we also need a command that tells the Artemis to transmit all of accumulated time data. We do this with the command SEND_TIME_DATA. The implementation is shown below.
Below are images of the received timestamps in Jupyter Notebook.

TEMP AND TIME DATA
We now add a temp_buffer to store temperature readings that can be correlated with
saved timestamps. We accomplish this by modifying our POPULATE_TIME_DATA handler to read
temperature data and populate our time_buffer. Below shows the updated code for our
POPULATE_TIME_DATA handler.
Along with modifying POPULATE_TIME_DATA, we also need to update SEND_TIME_DATA to
send temperature entries as well. During each iteration for an index i,
time_buffer[i] and temp_buffer[i] should be updated in one string.
Since the format of the string characteristic changed, we also need to update the
handle_notice(..) comamnd to correctly parse this new format.
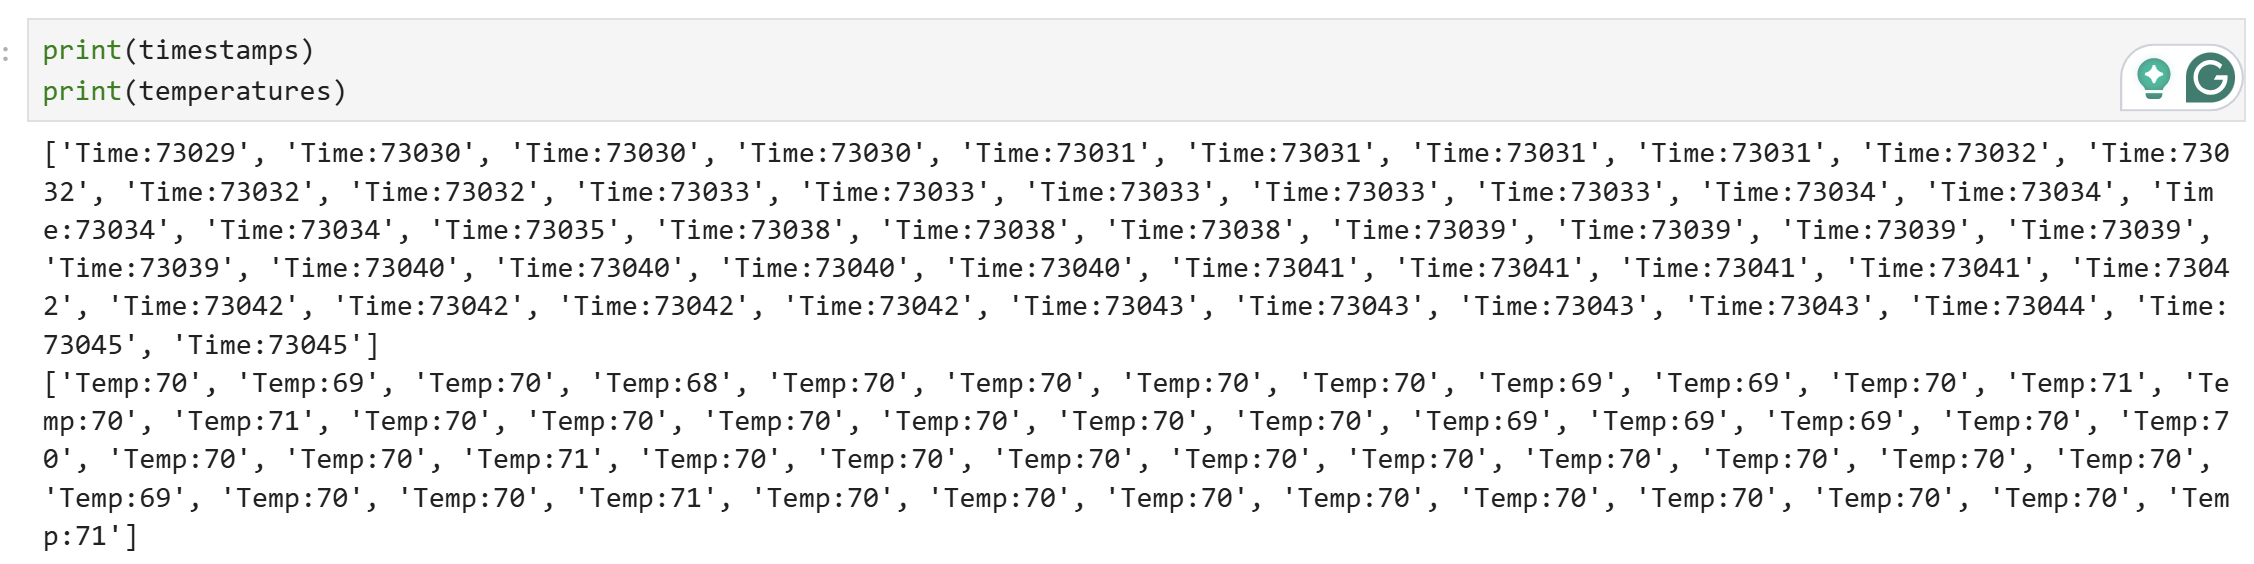
Below is the print-outs of the timestamps and temperatures array.
REAL-TIME TRANSMIT VS POPULATE THEN TRANSMIT
Discuss the differences between these two methods, the advantages and disadvantages of both and the potential scenarios that you might choose one method over another.
The first method, real-time data streaming, sends data as soon as it’s generated.
This is suitable for applications that need live updates, like real-time monitoring or
telemetry.
The big advantage here is that the receiving device gets the most up-to-date information right
away. However, the data rate is tied to how fast millis() can execute. This
increases the time between transmissions and decreases the data throughput and data resolution.
The second method, pre-stored data transfer, stores data in a buffer first and then sends the data seperately. This method allows for much higher data rates because the transmission is only limited by how fast you can index the array and write to the BLE characteristic. It also captures data at a muchhigher resolution since the sampling rate isn’t tied to how fast you can send it. On the downside, this method isn’t real-time. There’s a delay between when the data is generated and when it’s transmitted. It also requires more memory to store the data, which can be an issue for devices with limited resources.
Some concrete scenarios where real-time transmissions may be preferable over the pre-storage transmissions include feedback control loops and live-monitoring scenarios. Pre-storage could be preferrable in data-logging scenarios where high resolution is required for analysis.
How "quickly" can the second method record data?I am making the assumption this question is asking about how fast the pre-storage method can store data into memory, and not the transmission data rate. Observing the time and temperature timestamps, it took ~16 milliseconds to record 50 entries of time and tempearture data. Since each time and temperature data is 4 bytes, this means 50 * 4 * 2 = 400 total bytes were transmitted in ~16 milliseconds. Converting to seconds, ~25,000 bytes can be recorded per second.
The Artemis board has 384 kB of RAM. Approximately how much data can you store to send without running out of memory?I am making the assumption that all 384 kB of RAM are available for storing data. In reality, code, stack, and other processes take up part of this memory. With 384kB of memory, we can store a total of 96,000 bytes. This could be 48,000 time data entries and 48,000 temp data entries assuming time and temp are floats.
LAB DISCUSSION
Through this lab, I gained a deeper understanding of the Bluetooth Low Energy (BLE) protocol, particularly how data is transmitted between the computer and the Artemis board using GATT characteristics. One challenge I encountered was a blue screen error while using the serial monitor, which I suspect was caused by a memory overflow issue at the 115200 baud rate.
An interesting discovery was that the RESOLUTION_BITS setting applies not only to external ADC pins but also to internal ADCs, such as the temperature sensor. This means adjusting resolution impacts both internal and external readings, which was unexpected.
I also noticed that Serial.println() is a slow operation, and when used in real-time transmissions, it significantly reduced the speed of data updates. Removing unnecessary serial output improved performance and allowed data to be sent over BLE much faster.